This textbook was written for the clinical research community at Johns Hopkins leveraging the precision medicine analytics platform (PMAP). These notebooks are available in html form on the Precision Medicine portal as well as in computational form in the CAMP-share folder on Crunchr (Crunchr.pm.jh.edu).
XNAT is an open-source imaging informatics platform developed by the Neuroinformatics Research Group at Washington University with a REST-API for medical imaging data management and accessibility to various projects. Instead of organizing/handling DICOMs in the file organizer, one can access DICOMs (and associated metadata) on demand from their XNAT account. </br> </br> XNAT includes the following features:
Can I use XNAT without obtaining IRB approval?
Absolutely! We’ve created a series of Jupyter Notebooks, starting with this one, precisely to make it easy to explore and learn about XNAT without the need to have one of those pesky IRB protocols. The Notebooks are structured around an open-source, de-identified dataset.
Prerequisites to implement this notebook without an IRB protocol:
Go the XNAT login page
Click the “Johns Hopkins Login” button to login using your JHED ID.
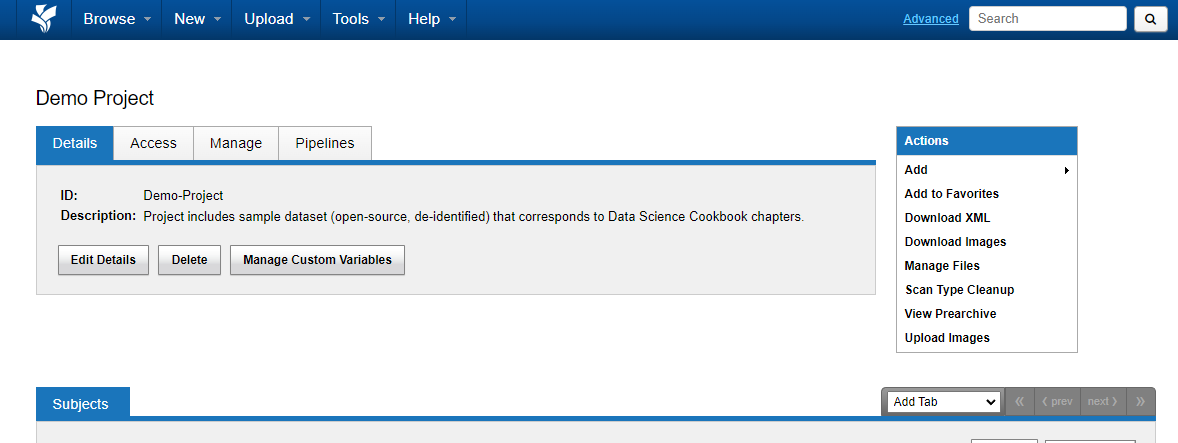
Once you’ve successfully logged in, under Projects, click on "Demo Project" to get to the following screen:
This is the sample dataset that this notebook uses. Notice the Project ID is Indicated as "Demo-Project".
Prerequisites to implement this notebook if you have an IRB protocol:
In order to use XNAT, you must have an XNAT account and session URL
XNAT account username should be JHED ID
</br> Can use XNAT either with IRB project or the default sample RSNA Brain Tumor Dataset. This notebook will display accessibility using the sample dataset.
XNAT SessionPydicomCurrently, accessing patient DICOMs requires managing several files and loading them.
Using an XNAT Session to programmatically access DICOMs using Jupyter notebook, the user can easily directly load a file instead of having to manage the various files in the file system and loading them one-by-one.
Install/Import XNAT and subsequent complementary packages for viewing and analysis:
Install XNAT using
piponly if not installed already </br> XNAT to be added as default library to Crunchr Container, so should only have to import
## added to container default
#pip install xnat
Requirement already satisfied: xnat in /home/idies/miniconda3/lib/python3.8/site-packages (0.4.2)
Requirement already satisfied: progressbar2>=3.11.0 in /home/idies/miniconda3/lib/python3.8/site-packages (from xnat) (4.0.0)
Requirement already satisfied: six>=1.13.0 in /home/idies/miniconda3/lib/python3.8/site-packages (from xnat) (1.15.0)
Requirement already satisfied: isodate>=0.5.4 in /home/idies/miniconda3/lib/python3.8/site-packages (from xnat) (0.6.1)
Requirement already satisfied: requests>=2.10.0 in /home/idies/miniconda3/lib/python3.8/site-packages (from xnat) (2.24.0)
Requirement already satisfied: click>=7.0.0 in /home/idies/miniconda3/lib/python3.8/site-packages (from xnat) (7.1.2)
Requirement already satisfied: sphinx-rtd-theme>=0.1.9 in /home/idies/miniconda3/lib/python3.8/site-packages (from xnat) (0.5.0)
Requirement already satisfied: python-utils>=3.0.0 in /home/idies/miniconda3/lib/python3.8/site-packages (from progressbar2>=3.11.0->xnat) (3.3.3)
Requirement already satisfied: chardet<4,>=3.0.2 in /home/idies/miniconda3/lib/python3.8/site-packages (from requests>=2.10.0->xnat) (3.0.4)
Requirement already satisfied: urllib3!=1.25.0,!=1.25.1,<1.26,>=1.21.1 in /home/idies/miniconda3/lib/python3.8/site-packages (from requests>=2.10.0->xnat) (1.25.10)
Requirement already satisfied: idna<3,>=2.5 in /home/idies/miniconda3/lib/python3.8/site-packages (from requests>=2.10.0->xnat) (2.10)
Requirement already satisfied: certifi>=2017.4.17 in /home/idies/miniconda3/lib/python3.8/site-packages (from requests>=2.10.0->xnat) (2020.6.20)
Requirement already satisfied: sphinx in /home/idies/miniconda3/lib/python3.8/site-packages (from sphinx-rtd-theme>=0.1.9->xnat) (3.2.1)
Requirement already satisfied: sphinxcontrib-applehelp in /home/idies/miniconda3/lib/python3.8/site-packages (from sphinx->sphinx-rtd-theme>=0.1.9->xnat) (1.0.2)
Requirement already satisfied: sphinxcontrib-devhelp in /home/idies/miniconda3/lib/python3.8/site-packages (from sphinx->sphinx-rtd-theme>=0.1.9->xnat) (1.0.2)
Requirement already satisfied: alabaster<0.8,>=0.7 in /home/idies/miniconda3/lib/python3.8/site-packages (from sphinx->sphinx-rtd-theme>=0.1.9->xnat) (0.7.12)
Requirement already satisfied: babel>=1.3 in /home/idies/miniconda3/lib/python3.8/site-packages (from sphinx->sphinx-rtd-theme>=0.1.9->xnat) (2.8.0)
Requirement already satisfied: imagesize in /home/idies/miniconda3/lib/python3.8/site-packages (from sphinx->sphinx-rtd-theme>=0.1.9->xnat) (1.2.0)
Requirement already satisfied: setuptools in /home/idies/miniconda3/lib/python3.8/site-packages (from sphinx->sphinx-rtd-theme>=0.1.9->xnat) (49.6.0.post20200814)
Requirement already satisfied: Jinja2>=2.3 in /home/idies/miniconda3/lib/python3.8/site-packages (from sphinx->sphinx-rtd-theme>=0.1.9->xnat) (2.11.2)
Requirement already satisfied: sphinxcontrib-qthelp in /home/idies/miniconda3/lib/python3.8/site-packages (from sphinx->sphinx-rtd-theme>=0.1.9->xnat) (1.0.3)
Requirement already satisfied: sphinxcontrib-serializinghtml in /home/idies/miniconda3/lib/python3.8/site-packages (from sphinx->sphinx-rtd-theme>=0.1.9->xnat) (1.1.4)
Requirement already satisfied: docutils>=0.12 in /home/idies/miniconda3/lib/python3.8/site-packages (from sphinx->sphinx-rtd-theme>=0.1.9->xnat) (0.16)
Requirement already satisfied: sphinxcontrib-jsmath in /home/idies/miniconda3/lib/python3.8/site-packages (from sphinx->sphinx-rtd-theme>=0.1.9->xnat) (1.0.1)
Requirement already satisfied: snowballstemmer>=1.1 in /home/idies/miniconda3/lib/python3.8/site-packages (from sphinx->sphinx-rtd-theme>=0.1.9->xnat) (2.0.0)
Requirement already satisfied: packaging in /home/idies/miniconda3/lib/python3.8/site-packages (from sphinx->sphinx-rtd-theme>=0.1.9->xnat) (20.4)
Requirement already satisfied: Pygments>=2.0 in /home/idies/miniconda3/lib/python3.8/site-packages (from sphinx->sphinx-rtd-theme>=0.1.9->xnat) (2.7.0)
Requirement already satisfied: sphinxcontrib-htmlhelp in /home/idies/miniconda3/lib/python3.8/site-packages (from sphinx->sphinx-rtd-theme>=0.1.9->xnat) (1.0.3)
Requirement already satisfied: pytz>=2015.7 in /home/idies/miniconda3/lib/python3.8/site-packages (from babel>=1.3->sphinx->sphinx-rtd-theme>=0.1.9->xnat) (2020.1)
Requirement already satisfied: MarkupSafe>=0.23 in /home/idies/miniconda3/lib/python3.8/site-packages (from Jinja2>=2.3->sphinx->sphinx-rtd-theme>=0.1.9->xnat) (1.1.1)
Requirement already satisfied: pyparsing>=2.0.2 in /home/idies/miniconda3/lib/python3.8/site-packages (from packaging->sphinx->sphinx-rtd-theme>=0.1.9->xnat) (2.4.7)
Note: you may need to restart the kernel to use updated packages.
import xnat
import pydicom
from pydicom.data import get_testdata_files
import matplotlib.pyplot as plt
import numpy
How to Connect to using your XNAT Session URL and XNAT User ID
Specify your XNAT session URL (should be provided to you), username (JHED ID without @jh.edu), and Project ID.
session_url = 'https://xnat-dev.pm.jh.edu'
session_url2 = 'https://xnat.pm.jh.edu'
#username = 'bmalik2'
project_id = 'kaggle'
Then enter your XNAT password to allow access:
session = xnat.connect('https://xnat.pm.jh.edu', user = '223c4741-d1bd-4fa2-a153-30626b8c6739')
session - Individual XNAT Session (URL)projects - All Accessible Projects dataset - Particular Study in XNAT with various patientsHow to view all accessible projects in XNAT
To access all the projects you are allowed access to via your XNAT account, use the projects object of your session.
Thereby, session.projects displays all accessible projects/datasets
4 Projects shown here: "Daisy", "kaggle", "DevOpsTesting5", and "DevOpsTesting6"
# All accessible Projects
session.projects
<XNATListing {(DevOpsTesting5, DevOpsTesting5): <ProjectData DevOpsTesting5 (DevOpsTesting5)>, (DevOpsTesting6, DevOpsTesting6): <ProjectData DevOpsTesting6 (DevOpsTesting6)>, (IRB01234567, Daisy): <ProjectData Daisy (IRB01234567)>, (kaggle, RSNA-MICCAI Brain Tumor Radiogenomic Classification): <ProjectData RSNA-MICCAI Brain Tumor Radiogenomic Classification (kaggle)>}>
Specify the Project name within session.projects
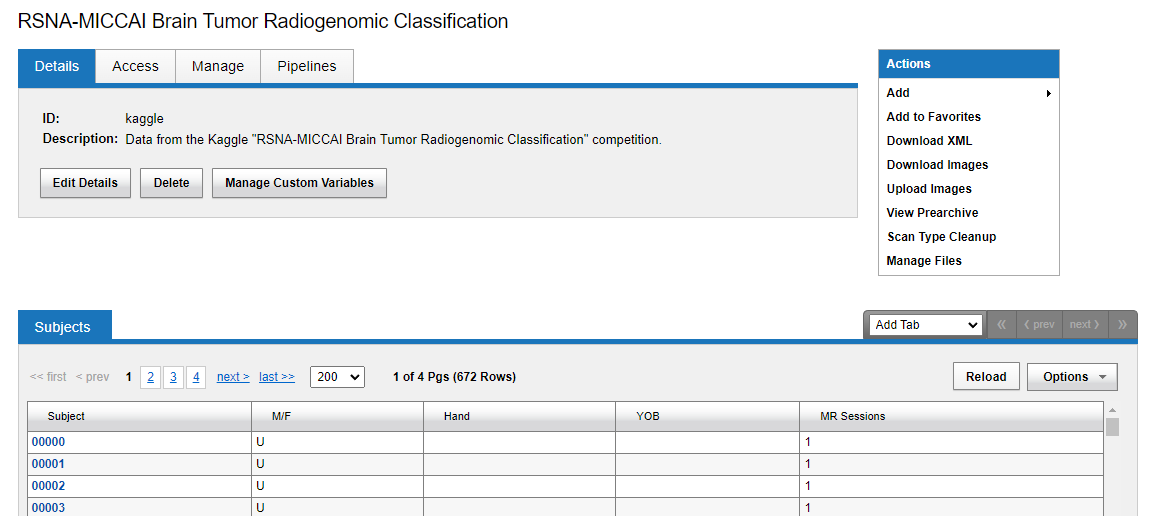
Example Dataset used: RSNA-MICCAI Brain Tumor Radiogenomic Classification
Specify the Project of interest by using the Project ID as attribute to session.project
Project IDis specified as first attribute of each project insession.projectlist above or in XNAT REST-API
kaggle is the project ID for the RSNA-MICCAI Brain Tumor Radiogenomic Classification sample dataset
session.projects[project_id]
<ProjectData RSNA-MICCAI Brain Tumor Radiogenomic Classification (kaggle)>
Specify the specific Project in your session (as shown above), then implement the subjects parameter of the dataset.
session.projects["kaggle"].subjectsobject includes all subjects in the project.
To calculate the total Number of all Patients within Dataset, calculate the length of the session.projects["kaggle"].subjects object
kaggle_project = session.projects[project_id]
print("Number of subjects in Dataset: ", len(kaggle_project.subjects))
Number of subjects in Dataset: 672
How to Access list of all Patient Numbers/Labels in respective Project
This allows the user to explore the study with its various patients and imaging series, aid their research analysis by knowing all the patients and number of patients in the study. This list can also be used to modify inclusion criteria.
session.projects["kaggle"].subjects.values() - Includes All Patients Data in XNAT Study/Dataset.subject.label - Patient ID Thereby, by printing the subject.label Patient ID for all Patient Data in the XNAT Study session.projects["kaggle"].subjects.values() using the below forloop, we can access the Patient IDs for all Patients in the Study:
for subject in session.projects[project_id].subjects.values():
    print(subject.label)
00822
00825
00111
00169
00113
00112
00001
00393
00116
00829
00826
00170
00053
00833
00422
00117
00997
00013
00120
00428
00171
00122
00121
00054
00123
00434
01006
00128
00124
00172
00015
00130
00176
00438
00056
00132
00447
00027
00000
00450
00133
00134
00177
00136
00458
00002
00037
00058
00460
00137
00178
00139
00138
00183
00140
00003
00047
00142
00462
00059
00184
00143
00144
00185
00463
00079
00146
00060
00005
00147
00149
00148
00150
00186
00151
00006
00187
00467
00080
00061
00154
00008
00188
00155
00474
00082
00191
00062
00156
00009
00192
00193
00011
00063
00091
00114
00489
00157
00119
00194
00125
00129
00158
00135
00492
00145
00195
00064
00159
00012
00196
00153
00160
00197
00503
00161
00066
00162
00014
00199
00165
00163
00068
00201
00017
00166
00521
00174
00203
00167
00018
00070
00181
00182
00204
00535
00206
00019
00231
00190
00071
00209
00233
00553
00200
00020
00234
00210
00072
00208
00211
00235
00021
00560
00573
00213
00585
00236
00212
00074
00214
00592
00229
00022
00077
00216
00237
00595
00024
00217
00252
00238
00025
00078
00218
00256
00239
00264
00026
00219
00603
00240
00081
00287
00307
00220
00241
00028
00323
00644
00221
00084
00242
00243
00333
00222
00030
00245
00085
00227
00335
00647
00228
00031
00246
00337
00230
00247
00087
00032
00662
00286
00355
00249
00088
00372
00288
00250
00033
00381
00671
00251
00289
00035
00089
00384
00290
00291
00253
00339
00681
00036
00254
00294
00258
00340
00293
00090
00043
00259
00341
00699
00296
00094
00260
00343
00297
00044
00298
00344
00261
00702
00262
00095
00045
00299
00346
00263
00096
00347
00046
00266
00300
00712
00349
00348
00301
00267
00097
00350
00048
00269
00303
00270
00098
00351
00719
00304
00271
00049
00352
00100
00305
00721
00099
00102
00104
00052
00273
00105
00353
00106
00107
00306
00400
00275
00274
00108
00356
00109
00308
00749
00110
00401
00359
00280
00456
00402
00309
00457
00281
00459
00403
00360
00282
00310
00762
00364
00404
00405
00311
00366
00283
00464
00312
00367
00406
00769
00284
00369
00313
00285
00407
00466
00370
00821
00314
00779
00408
00574
00316
00371
00575
00317
00409
00468
00520
00576
00373
00410
00318
00577
00578
00376
00523
00469
00377
00412
00320
00579
00581
00378
00321
00413
00470
00583
00582
00524
00584
00322
00379
00414
00586
00380
00324
00525
00587
00416
00472
00325
00588
00382
00589
00417
00383
00327
00590
00418
00526
00477
00591
00386
00328
00419
00593
00329
00387
00388
00594
00421
00528
00478
00596
00331
00423
00389
00597
00332
00529
00390
00425
00479
00598
00334
00391
00426
00530
00429
00599
00336
00338
00532
00392
00480
00430
00431
00395
00601
00533
00481
00397
00623
00432
00399
00602
00433
00537
00436
00483
00624
00687
00441
00440
00604
00485
00538
00442
00443
00625
00688
00444
00605
00488
00539
00445
00626
00446
00690
00449
00606
00540
00491
00451
00607
00628
00452
00691
00454
00542
00493
00455
00608
00630
00692
00543
00750
00494
00610
00631
00544
00693
00611
00495
00751
00636
00694
00545
00638
00496
00753
00612
00498
00697
00547
00756
00613
00639
00548
00499
00698
00757
00640
00549
00615
00703
00500
00758
00616
00641
00550
00501
00759
00704
00642
00551
00618
00502
00645
00760
00552
00705
00619
00764
00706
00646
00504
00554
00765
00620
00505
00707
00649
00767
00555
00708
00506
00621
00650
00507
00768
00622
00807
00556
00808
00809
00709
00810
00651
00811
00557
00814
00816
00714
00772
00818
00510
00819
00820
00652
00823
00824
00828
00830
00715
00773
00511
00558
00559
00834
00654
00836
00716
00774
00837
00512
00561
00655
00838
00775
00718
00563
00839
00513
00656
00840
00564
00998
00777
00999
00514
00723
00657
01000
00780
00778
00565
00781
00567
01001
00516
00782
01003
01002
00784
00568
00658
00724
00788
00787
00789
00569
01004
00791
00570
01005
00517
00571
00793
00792
00794
00795
00572
01007
00796
00725
00659
00797
00799
01008
00518
00801
01009
00800
00802
00727
00803
00804
00661
00805
01010
00806
00519
00663
00728
00729
00667
00668
00730
00731
00674
00732
00675
00733
00734
00676
00735
00677
00736
00679
00737
00680
00682
00739
00683
00740
00684
00742
00685
00744
00686
00746
00747
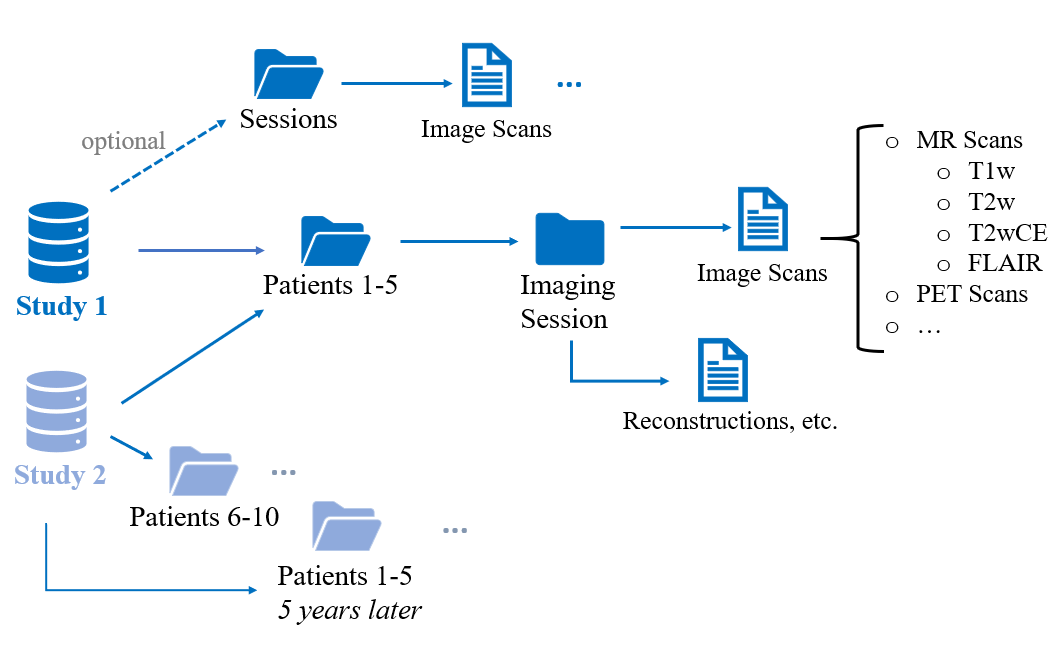
XNAT has specific terminology to its Data Organization and understanding aides in research analysis of the study. The Diagram below explains the organization format.
Dataset > Patient > MR Session > Patient Metadata + Scans
Scans > T2w, T1w, FLAIR, T1wCE
Study 1 can be IRB Study A, etc.
Create File object for particular Subject Scan
File Object - Allows us to use, access and manipulate the particular file
ex: T2w Scan for Patient "00822"
Parameters Include:
Project ID - "kaggle" project ID for your XNAT sessionSubjects - Individual Patient ID, choose patient '00822' from list of Patient IDs in previous cellsExperiments - Same as Subjects, choose patient '00822' from list of Patient IDs in previous cellsScans - Various imaging series available for Patient, choose patient can 'T2w'Resources - Includes DICOM and Metadata for particular imaging series. "DICOM" indicates imaging series filefiles - Access all files within "DICOM" and specify the first file with [0]file_object_T2w = session.projects[project_id].subjects['00822'].experiments['00822'].scans['T2w'].resources['DICOM'].files[0]
It is crucial to visualize DICOM Data to understand the study and patient imaging series -- which allows researchers to better build their analysis. Instead of managing various files, XNAT allows one to easily view the Patient Imaging series directly in Jupyter Notebook.
Using Pydicom, we read the File Object (defined previously, T2w image) and display it using matplotlib.pyplot
ds = pydicom.dcmread(file_object_T2w.open())
plt.imshow(ds.pixel_array)
<matplotlib.image.AxesImage at 0x7fc74ad4e2b0>

By Accesing the raw DICOM Header Metadata, researchers can better understand the study and modify inclusion/exclusion criteria. Via XNAT, the user does not have to manage metadata and can instead view it easily using the File Object
Using Pydicom.dcmread function to read the opened File Object (as defined in the cells above), we can define the DICOM metadata variable and display it.
# DICOM Header Metadata
dicom_metadata = pydicom.dcmread(file_object_T2w.open())
dicom_metadata
Dataset.file_meta -------------------------------
(0002, 0000) File Meta Information Group Length  UL: 206
(0002, 0001) File Meta Information Version       OB: b'\x00\x01'
(0002, 0002) Media Storage SOP Class UID         UI: MR Image Storage
(0002, 0003) Media Storage SOP Instance UID      UI: 1.2.826.0.1.3680043.8.498.12617885361504107518113193736037918908
(0002, 0010) Transfer Syntax UID                 UI: Explicit VR Little Endian
(0002, 0012) Implementation Class UID            UI: 1.2.40.0.13.1.1
(0002, 0013) Implementation Version Name         SH: 'dcm4che-2.0'
(0002, 0016) Source Application Entity Title     AE: 'YOURAE'
-------------------------------------------------
(0008, 0005) Specific Character Set              CS: 'ISO_IR 100'
(0008, 0008) Image Type                          CS: ['DERIVED', 'SECONDARY']
(0008, 0016) SOP Class UID                       UI: MR Image Storage
(0008, 0018) SOP Instance UID                    UI: 1.2.826.0.1.3680043.8.498.12617885361504107518113193736037918908
(0008, 0050) Accession Number                    SH: '00822'
(0008, 0060) Modality                            CS: 'MR'
(0008, 103e) Series Description                  LO: 'T2w'
(0010, 0010) Patient's Name                      PN: '00822'
(0010, 0020) Patient ID                          LO: '00822'
(0018, 0023) MR Acquisition Type                 CS: '2D'
(0018, 0050) Slice Thickness                     DS: '5.0'
(0018, 0081) Echo Time                           DS: None
(0018, 0083) Number of Averages                  DS: '1.0'
(0018, 0084) Imaging Frequency                   DS: '123.245481'
(0018, 0085) Imaged Nucleus                      SH: '1H'
(0018, 0086) Echo Number(s)                      IS: '1'
(0018, 0087) Magnetic Field Strength             DS: '3.0'
(0018, 0088) Spacing Between Slices              DS: '1.0'
(0018, 0089) Number of Phase Encoding Steps      IS: '396'
(0018, 0091) Echo Train Length                   IS: '18'
(0018, 0093) Percent Sampling                    DS: '75.0'
(0018, 0094) Percent Phase Field of View         DS: '100.0'
(0018, 0095) Pixel Bandwidth                     DS: '220.0'
(0018, 1310) Acquisition Matrix                  US: [0, 512, 384, 0]
(0018, 1312) In-plane Phase Encoding Direction   CS: 'ROW'
(0018, 1314) Flip Angle                          DS: '120.0'
(0018, 1316) SAR                                 DS: '0.42682373938699'
(0018, 1318) dB/dt                               DS: '0.0'
(0018, 5100) Patient Position                    CS: 'HFS'
(0020, 000d) Study Instance UID                  UI: 1.2.826.0.1.3680043.8.498.23345897988800591738697565218585968650
(0020, 000e) Series Instance UID                 UI: 1.2.826.0.1.3680043.8.498.80644139033959530024721674338065709767
(0020, 0011) Series Number                       IS: '8'
(0020, 0013) Instance Number                     IS: '8'
(0020, 0032) Image Position (Patient)            DS: [-86.014913593922, -95.009867179948, -17.263729716536]
(0020, 0037) Image Orientation (Patient)         DS: [0.9874086982475, 0.05804817390263, -0.1471545858332, -0.0973382762022, 0.95623515880841, -0.2759340157441]
(0020, 1040) Position Reference Indicator        LO: ''
(0020, 1041) Slice Location                      DS: '-54.370920993433'
(0028, 0002) Samples per Pixel                   US: 1
(0028, 0004) Photometric Interpretation          CS: 'MONOCHROME2'
(0028, 0010) Rows                                US: 512
(0028, 0011) Columns                             US: 512
(0028, 0030) Pixel Spacing                       DS: [0.390625, 0.390625]
(0028, 0100) Bits Allocated                      US: 16
(0028, 0101) Bits Stored                         US: 16
(0028, 0102) High Bit                            US: 15
(0028, 0103) Pixel Representation                US: 0
(0028, 1050) Window Center                       DS: '742.0'
(0028, 1051) Window Width                        DS: '1506.0'
(0028, 1052) Rescale Intercept                   DS: '0.0'
(0028, 1053) Rescale Slope                       DS: '1.0'
(0028, 1054) Rescale Type                        LO: 'US'
(6781, 1000) Private tag data                    UN: b'Project:kaggle'
(7fe0, 0010) Pixel Data                          OW: Array of 524288 elements
Users can locally download Patient Imaging Series if they need local access to the file.
Specify the Patient Scan using the same File Object Parameters mentioned previously
Instead of creating File Object, only Specify Patient Scan
download_dirrequires path to file where Patient Series should be downloaded to.
path_to_download = "./"
# Locate Patient scan, then download
scan_to_download = session.projects[project_id].subjects['XNAT_S00007'].experiments['XNAT_E00006'].scans['T2w']
scan_to_download.download_dir(path_to_download)